
Simple Python Logger Framework for Databricks, Part 2: Create a Python DatabricksLogger
Part 2 of 3 of the Simple Python Logger Framework for Databricks series

Welcome to Part 2 of the tutorial in which we will explore how to build a simple yet powerful Python logging framework with minimal effort in Azure Databricks. The tutorial is split into three parts, each covering a distinct topic:
Part 1 is about redirecting the Driver logs from Databricks Clusters to Volume in order to permanently store and analyze them.
In Part 2 we are creating a custom logger object in Python that can be used in the data processing framework of the Data Lakehouse.
Part 3 is on how the resulting cluster log files can be analyzed using Databricks onboard tools.
In the first part of this tutorial, we made sure that the log files are permantly stored in a Unity Catalog Volume. The second part is about proper logging inside Python that will show up in the cluster logs.
Create and Test a Custom Python Logger Class
Note: All things described in this tutorial will work without completing Part 1: Deliver Cluster Logs to a Volume. However, in order to properly analyze the logged events this should be taken care of.
In order to quickly create and test a custom Python logger class, go to your Databricks Workspace and create a Notebook. In the first cell copy and paste the following code.
import logging
import sys

class DatabricksLogger(logging.Logger):
    """
    A custom logger class that extends logging.Logger to facilitate
    logging with configurable log levels using string inputs.

    The logs will be directed to the stdout destination. Make sure to
    redirect cluster logs of the Databricks Cluster to a Volume for
    later use.

    This class allows users to set the logging level using strings,
    abstracting the need to import and use the logging module directly.

    Parameters
    ----------
    name : str
        The name of the logger.
    level : str, optional
        The logging level as a string (e.g., 'DEBUG', 'INFO').
        Default is 'DEBUG'.

    Attributes
    ----------
    _LOG_LEVELS : dict
        A dictionary mapping string representations of log levels to
        their corresponding logging level constants.
    """

    # Define a mapping of level names to logging levels
    _LOG_LEVELS = {
        'DEBUG': logging.DEBUG,
        'INFO': logging.INFO,
        'WARNING': logging.WARNING,
        'ERROR': logging.ERROR,
        'CRITICAL': logging.CRITICAL
    }

    def __init__(self, name, level='DEBUG'):
        """
        Initialize the DatabricksLogger with a specified name and
        logging level.

        Parameters
        ----------
        name : str
            The name of the logger.
        level : str, optional
            The logging level as a string (e.g., 'DEBUG', 'INFO').
            Default is 'DEBUG'.
        """
        # Map the string level to the corresponding logging level
        # constant
        log_level = self._LOG_LEVELS.get(level.upper(), logging.DEBUG)
        super().__init__(name, log_level)
        self._setup_logging(log_level)

    def _setup_logging(self, level):
        """
        Set up the logging configuration with the specified level.

        Parameters
        ----------
        level : int
            The logging level constant from the logging module.
        """
        handler = logging.StreamHandler(sys.stdout)
        formatter = (
            logging
                .Formatter(
                    '%(name)s|%(asctime)s|%(levelname)s|%(message)s'
                )
        )
        handler.setFormatter(formatter)
        # prevent duplicate handlers
        if not any(
            isinstance(h, logging.StreamHandler)
            and h.stream == sys.stdout
            for h in self.handlers
        ):
            self.addHandler(handler)

        self.setLevel(level)
Our DatabricksLogger directly inherits from the build-in Python logging facility.1 Basically, we are only changing three things:
We create a Mapping from strings to logging objects for the log levels. This increases usability since we only have to pass the log level as a string (I love string parameters, although I know some would like to kill me for that).
We add a StreamHandler that redirects the logs into the stdout destination, which in Databricks are the Cluster logs. This way, we don’t have to take care of the file handling of the log files since it is already implemented by Databricks.
The formatting of the log string ist defined as the name of the Logger, the timestamp, the log level and the actual message. They are all divided by a pipe so we can comfortably parse them later on.
To test the logger, run the cell. The compute must not be a serverless instance since log file delivery is not available yet for this type of compute.
Next, create another cell and an instance of our logger. With this logger object, anything might be logged within Notebooks or custom Python packages using this logger.
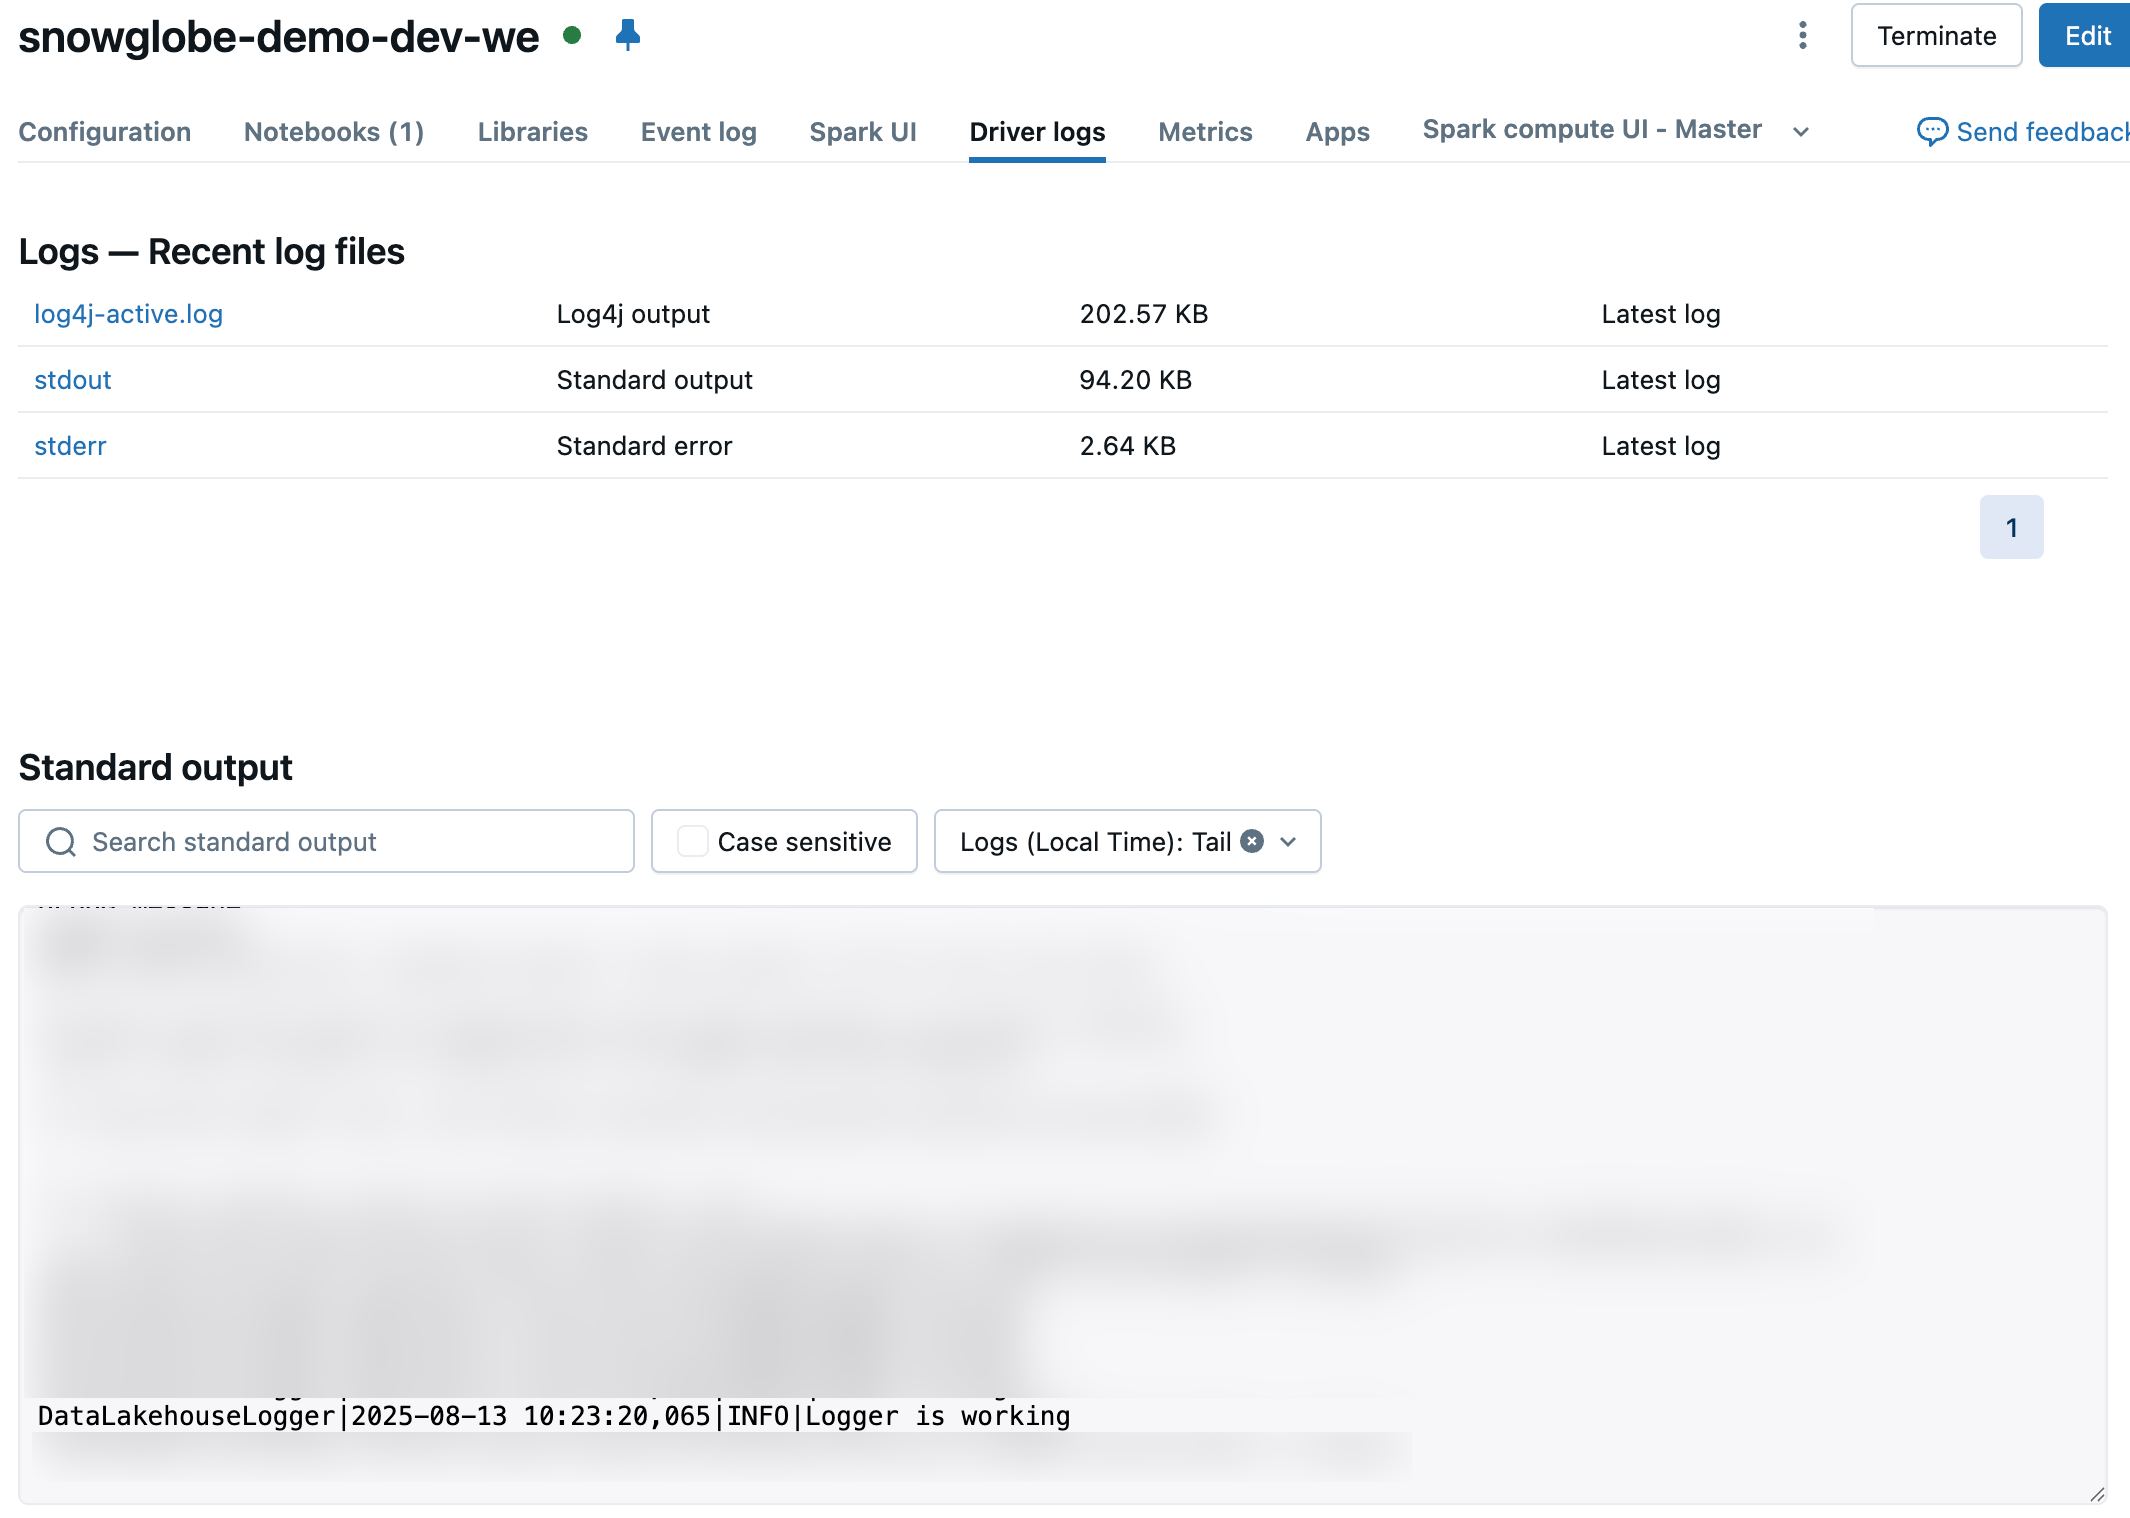
logger = DatabricksLogger("DataLakehouseLogger")

logger.info("Logger is working")
This results in something like this in the console:
DataLakehouseLogger|2025-08-13 10:23:20,065|INFO|Logger is workingWhen inspecting the driver logs of the cluster this was running on, you will see something like this.
Creating a Python Package
Now that we have tested our logger, it is time to create a Python package that can be used in our Databricks Workspace.
Setup the Repo Structure
Note: Instead of creating this Repo from scratch like described here, you can download it from my GitHub.
Go to your favorite version control platform and create a Git-Repository. Check it out to your local computer. I use Azure DevOps or GitHub in combination with VS Code most of the time.
We will create a very basic Python package with only the absolutely necessary files. For this, create the following folder structure with these files in it.
DatabricksLogger/
│
├── src/
│   │
│   └── databrickslogger
│       ├── __init__.py
│       └── logger.py
│
├── .gitignore
└── setup.py
Copy & paste the code from our very first cell from the Notebook which defines the custom logger class into logger.py. Next, add the following code to the __init__.py file:
from .logger import DatabricksLoggerNote: This will make sure we will later be able to directly import the logger like this:
from databrickslogger import DatabricksLoggerIf we wouldn’t do this, we would have to import it like this, which is a bit ugly:
from databrickslogger.logger import DatabricksLogger
In the root of your repository, add to the setup.py file the following content:
from setuptools import setup, find_packages

setup(
    name="DatabricksLogger",
    version="0.1",
    author="Martin Debus",
    author_email="martin.debus@snowglobe.ai",
    description="A simple Databricks Logger",
    python_requires=">=3.9",
    classifiers=[
        "Programming Language :: Python :: 3",
        "Operating System :: OS Independent",
    ],
    license="MIT",
    packages=find_packages(),
)
You may change the personal information or apply your own versioning scheme.
Finally, add the following lines to the .gitignore file:
dist
DatabricksLogger.egg-info
This keeps your repository clean from the files created during the build process of the wheel package file when committing changes.
Create a Wheel
With all the necessary files in place, we will proceed to create a wheel file. In this tutorial, I will describe how to do that using VS Code on Mac. The process is quite similar on Windows.
Make sure you have checked out the repository and the files to your local machine.
In VS, open the terminal and navigate to the root of the repository.
Run:
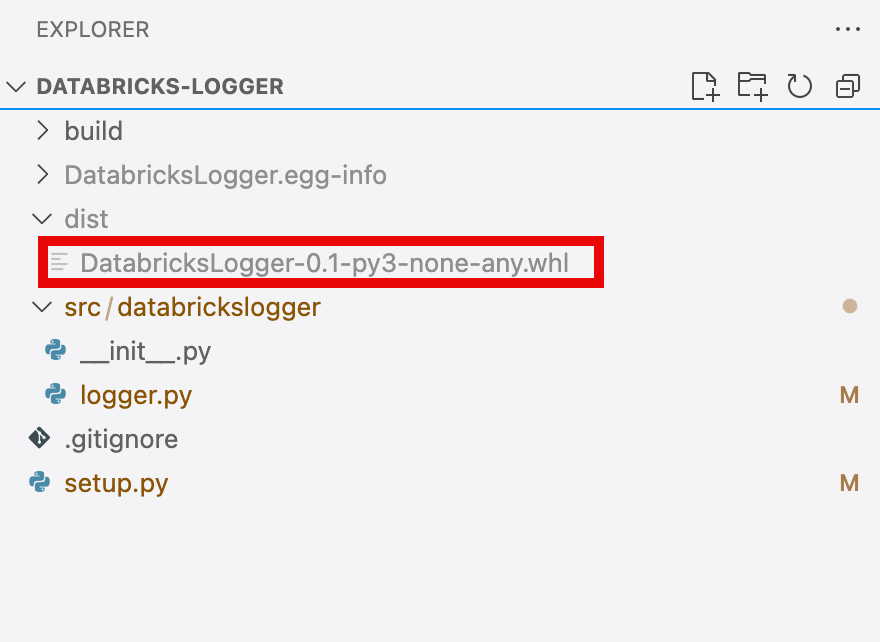
python setup.py bdist_wheel
This creates a wheel file in the dist folder (this folder is automatically created).
This wheel might now be used in any Package manager. We will skip this step and will directly upload into Databricks. This is not ideal for production environments, but since we do not intend to change the logger frequently, for this use case this is the most straightforward approach.
Use the Logger in Databricks
To use the Logger in Databricks we have to upload it into a Volume and add it to the cluster libraries. Then we can use it in our code.
Upload to Volume
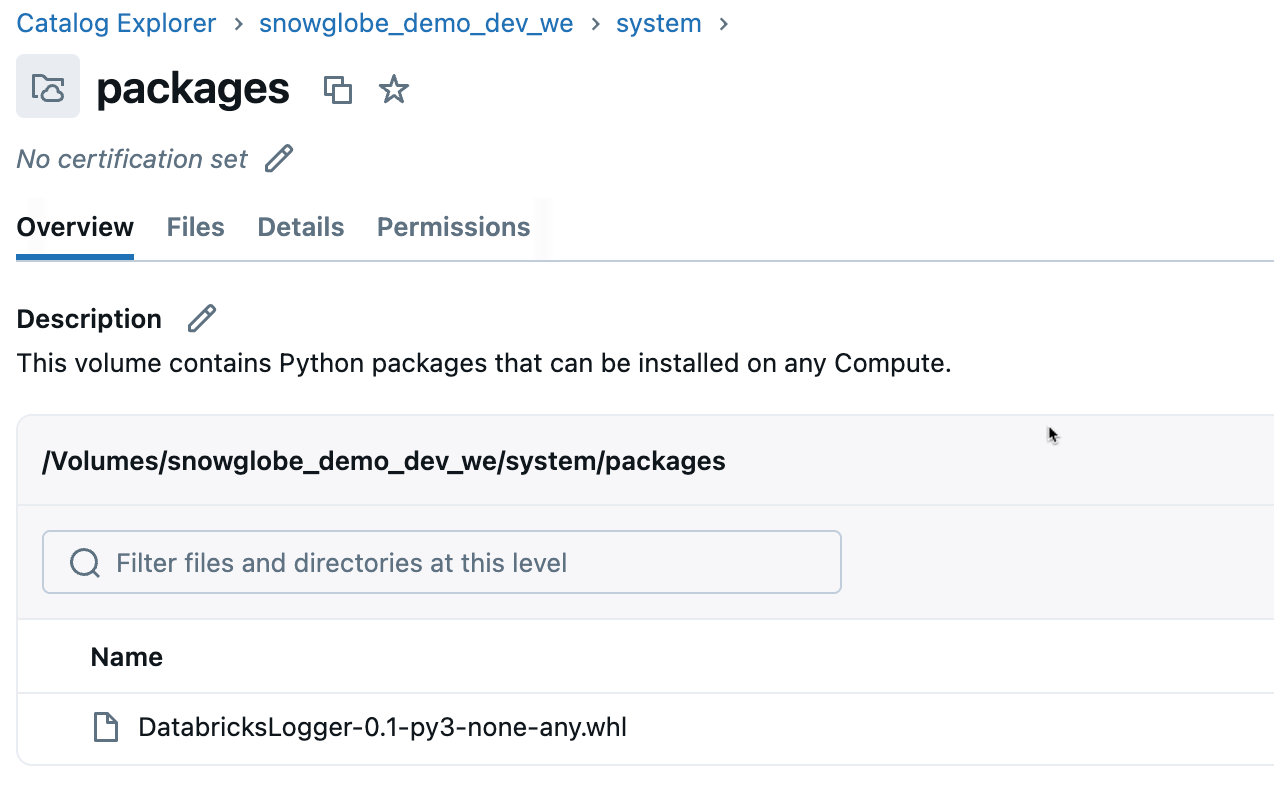
We will now upload the wheel file to a Volume in Unity Catalog where any Cluster might be able to access it. In Part 1 of this tutorial we created a system schema and within this a Volume named packages. Upload the wheel file into this Volume.
Install on Cluster
Next, go to your Cluster and do the following:
go to the
librariessectionclick
installselect
Volumebrowse to your wheel file and select it
It will now be installed on your cluster every time you start it.

Note: For any job cluster, this must be defined as a library in the job configs in order to use it.
Usage in code
In any Notebook or Python package you can now use the logger to log events that will end up in the log files in the logging Volume like this:
from databrickslogger import DatabricksLogger

logger = DatabricksLogger("DataLakehouseLogger")

logger.info("Logger is working")
Wrap Up
This concludes the second part of the series Simple Python Logger Framework for Databricks. We created a custom Python logger object, packaged it to a wheel file and deployed it to our Databricks Workspace. Using this logger writes the log messages to the console as well as to the Cluster logs.
The last part of the series will dive into how to use the cluster logs and analyze them: Part 3: Analyze Cluster Log Files in Databricks SQL.
https://docs.python.org/3/library/logging.html