
Simple Python Logger Framework for Databricks, Part 3: Analyze Cluster Log Files in Databricks SQL
Part 3 of 3 of the Simple Python Logger Framework for Databricks series

Welcome to the third part the tutorial in which we will explore how to build a simple yet powerful Python logging framework with minimal effort in Azure Databricks.
Part 1 is about redirecting the Driver logs from Databricks Clusters to Volume in order to permanently store and analyze them.
In Part 2 we are creating a custom logger object in Python that can be used in the data processing framework of the Data Lakehouse.
Part 3 is on how the resulting cluster log files can be analyzed using Databricks onboard tools.
In this third and final part we will make use of the log entries we created. The log files could be analyzed with specific tools like Grafana or Azure Monitoring (Log Analytics), but we will stick to an all Databricks approach. The log entries will be loaded into delta tables and prepared for further analytics. Finally, we will build a simple dashboard to visualize the log information.
Create some (synthetic) Log Entries
For this tutorial, I have used the Logger to create some artificial log entries. I simply created a Notebook and ran the following code multiple times and with different names for the Logger.
import random
import time

from databrickslogger import DatabricksLogger

# Define log levels and their weights (higher weight = more frequent)
log_levels = [
    (logging.INFO, 40),    # INFO: 40% chance
    (logging.DEBUG, 30),   # DEBUG: 30% chance
    (logging.WARNING, 20), # WARNING: 20% chance
    (logging.ERROR, 10)    # ERROR: 10% chance
]

# Generate artificial logs
def generate_logs(num_logs=200):
    for _ in range(num_logs):
        # Choose a random log level based on weights
        level = random.choices(
            [l[0] for l in log_levels],
            weights=[l[1] for l in log_levels],
            k=1
        )[0]

        # Generate a log message
        if level == logging.ERROR:
            message = f"Failed due to {random.choice(['timeout', 'permission denied', 'corrupt data'])}"
        elif level == logging.WARNING:
            message = f"{random.choice(['Slow response', 'Partial data loaded', 'Retrying...'])}"
        elif level == logging.DEBUG:
            message = f"{random.choice(['Debug info: row count=1000', 'Debug info: schema validated', 'Debug info: connection established'])}"
        else:  # INFO
            message = f"{random.choice(['Success', 'In progress', 'No issues detected'])}"

        # Log the message
        logger.log(level, message)

        # Simulate delay between logs
        time.sleep(random.uniform(0.1, 0.5))

# Create Logger Object
logger = DatabricksLogger('DataLakehouseLogger')

# Run the log generator
generate_logs()
This generates log entries with the configured distribution of log level with some artificial messages. To test the loading mechanism of log files, this is sufficient.
Read the Log with a Lakeflow Declarative Pipeline
Assuming the DatabricksLogger was used to create some log entries (either real or synthetic like described above), we now proceed to read the log files, process them and write them into some tables. This will be a two-step process: First, we will read all log data from the driver stdout into a table. Second, we will extract only the entries created by the DatabricksLogger and write them to another table.
We will use Spark Declarative Pipelines and SQL to create the data processing pipeline.
Create a new pipeline like this:
Go to Pipelines & Jobs
Select ETL pipeline
Give it a name like Process Log Files
Select Start with an empty file
Select SQL as language for the first file
On the on the right side next to the pipeline, configure your default
catalogandschemafor this pipeline. If no further name spaces are used in the code, this will be used.
Rename the my_transformation.sql to driver_stdout_raw.sql in the transformations folder and add the following content.
CREATE OR REFRESH STREAMING TABLE
  driver_stdout_raw
COMMENT "Raw Driver Log Data."

AS

SELECT
  value,
  current_timestamp AS _load_timestamp,
  _metadata.file_path AS _file_path
FROM STREAM
  read_files(
    '/Volumes/<catalog-name>/system/logging/*/driver/stdout*',
    format => "text"
  )
This will read all driver log stdout data from all clusters that wrote their log data into the volume. The table is defined as a STREMING TABLE reading from a Volume. That means the Databricks Autoloader is utilized and only new files will be processed. If no updates are found, no data is loaded.
Note: In order to not only catch new files but also changed files, enable file events for an external location.
Next, we extract the DatabricksLogger data and stored them in a MATERIALIZED VIEW. We split the value from the log file using the logger pattern defined in our custom DatabricksLogger. Add a logger_data.sql to the transformations folder with this code.
CREATE OR REFRESH MATERIALIZED VIEW
  logger_data
COMMENT "Data From Databricks Logger."

AS

SELECT
  SPLIT(value,"\\|")[0] AS app,
  TO_TIMESTAMP(
         REGEXP_REPLACE(SPLIT(value,"\\|")[1], ',', '.'),
         'yyyy-MM-dd HH:mm:ss.SSS'
       ) AS timestamp,
  SPLIT(value,"\\|")[2] AS level,
  SPLIT(value,"\\|")[3] AS message,
  _file_path AS file_path
FROM
  driver_stdout_raw

WHERE SPLIT(value,"\\|")[3] IS NOT NULL
Now you can run the Pipeline and see if everything works without error. In this case it should look something like this.
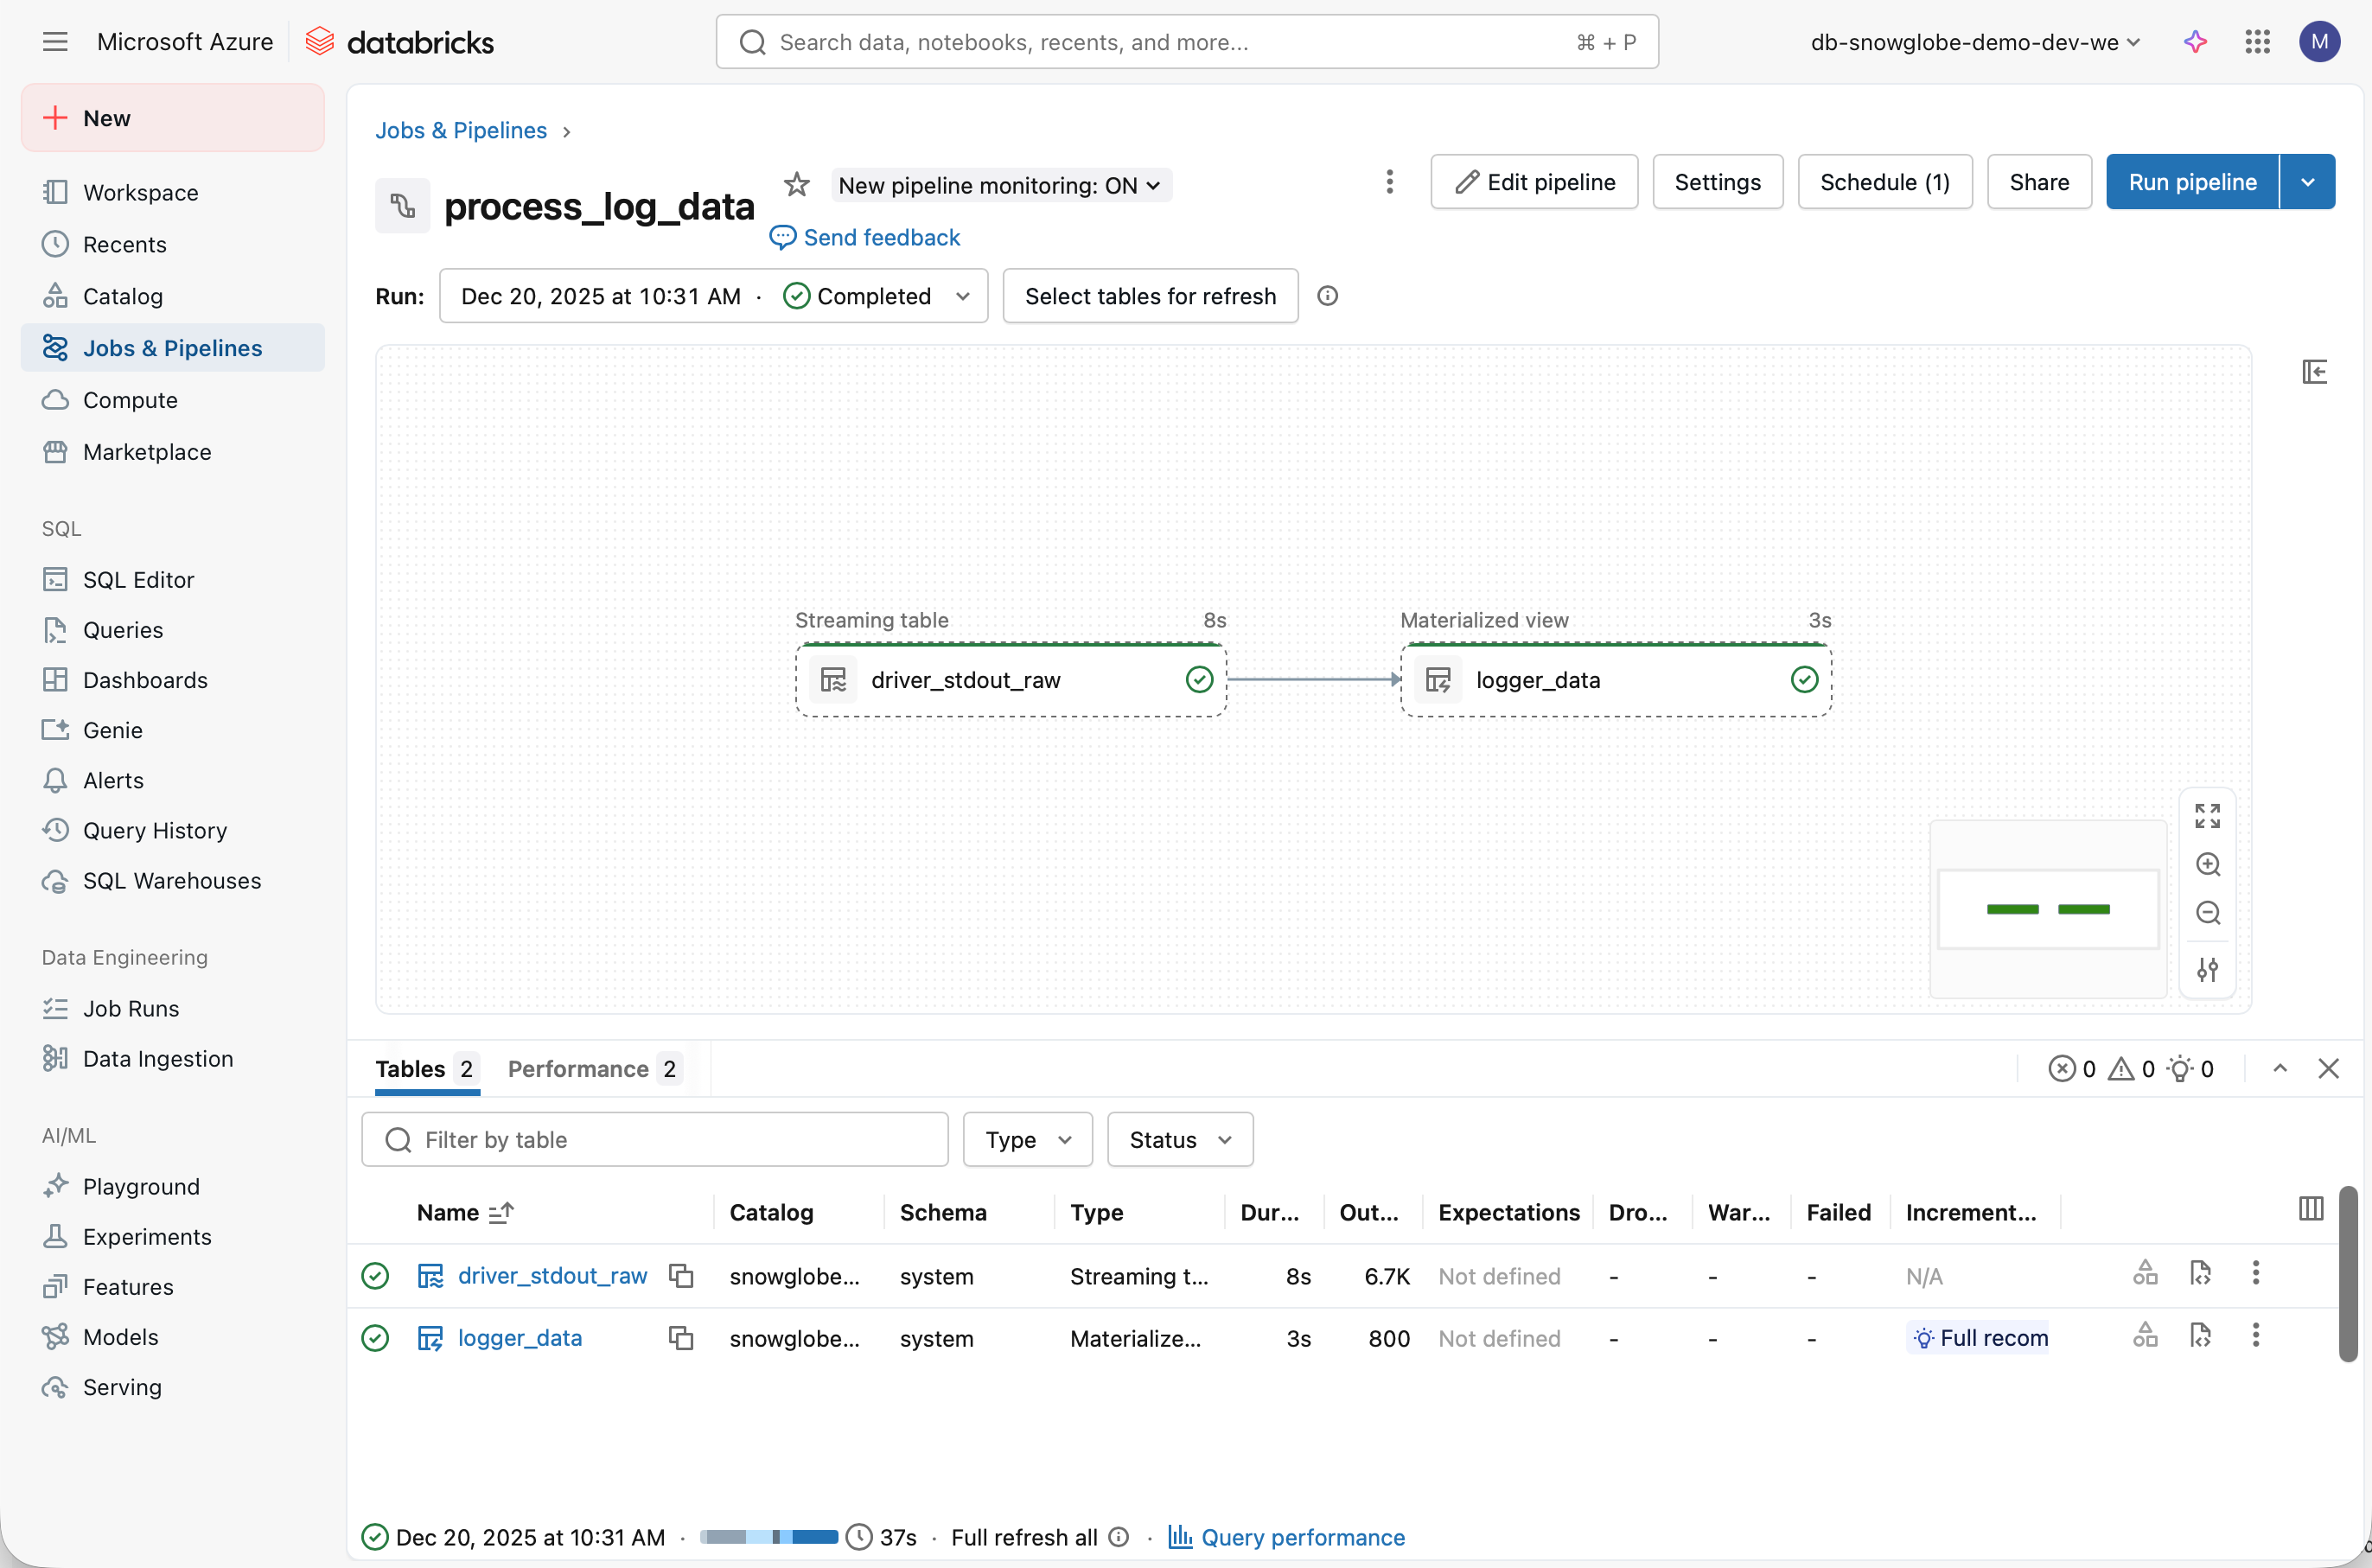
Finally, create a schedule to run the job periodically to refresh the tables.
I recommend turning the pipeline into a Databricks Asset Bundle and deploy it to your workspace.
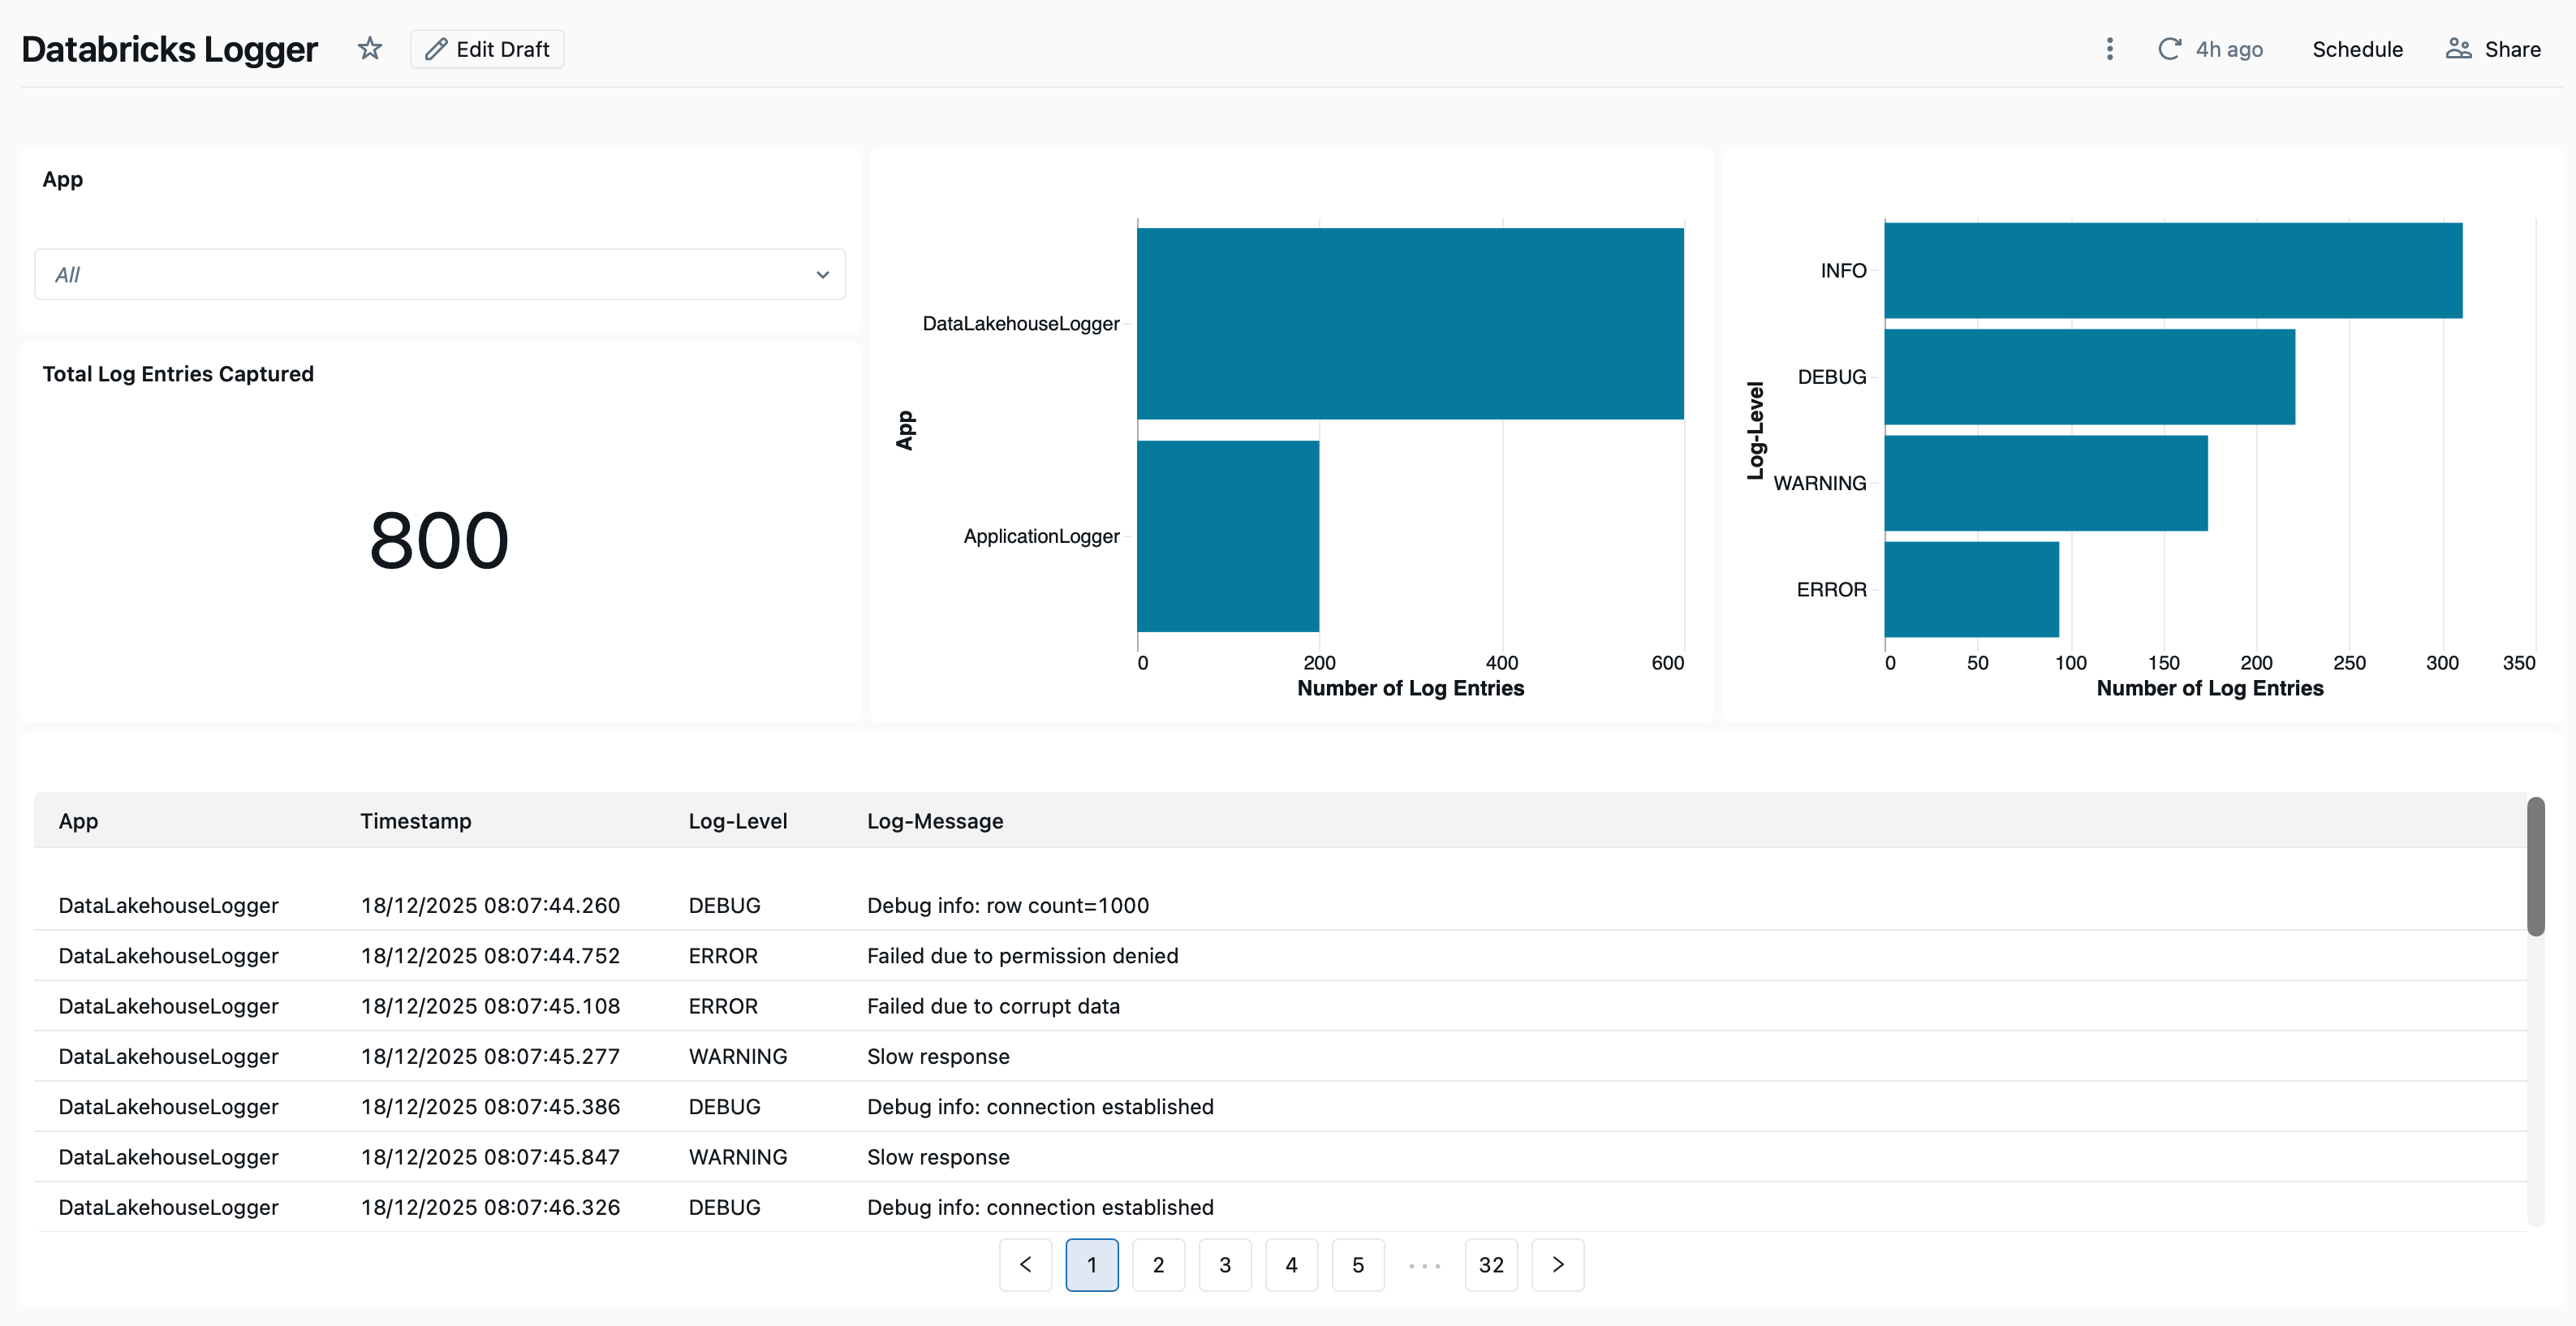
Visualize Data on a Dashboard
The data can now be analyzed using SQL. We will go a step further and create a simple Databricks Dashboard.
go to Dashboards
click Create dashboard
give the dashboard a name like Databricks Logger
on the data tab, click Add data source and select the logger_data materialized view
go to the Untitled page tab and rename it into Overview
You can now create visualizations for your data. I did the following:
added a filter for App
added a counter for the total number of log entries
added a bar chart to show number of logs per App
added a bar chart to show number of logs per Log-Level
added a table with the full log data
The result looks like this.
You should publish your Dashboard (I recommend Individual Data Permissions) and share it with others.
Wrap Up
In this comprehensive end-2-end tutorial I presented my approach on how to create a custom Python logger for Databricks. I focused on using Databricks built in features like redirecting the cluster logs into a Volume (Part 1), creating a custom logger object from the standard Python logging module (Part 2) and finally ingesting the log data into tables to enable log analytics (Part 3).
Thank you for reading and following along. If you liked this tutorial consider subscribing to my Substack.